
Well, I'm preparing to run a cloak sewing workshop for the Order of the Golden Lion two weekends from now. Looks like I'll be making my own cloak sooner than I'd expected. The basic pattern we intend to use is here:
http://home.clara.net/arianrhod/Aldebaran/DoItYourself/Cloak02.html
The Pres. tried this pattern and has a gorgeous cloak. She had to make a few huge changes though. For one, the neck hole should not be semicircular. It should be moved back to be more of a complete circle. This keeps the cloak from choking you. Secondly, the hood provided with this cape is totally ineffective. I'm going to try to find a new hood pattern for my group.
I read "What Fabric Should I Use?" and "Colors for Lower-Class Elizabethan Clothing" here: http://www.elizabethancostume.net/
Since we actually spend a fair amount of time outside, we're all leaning toward wool cloaks for warmth. Some of the group members are also talking about lining their cloaks with satin, cotton, or a blend. One guy wants a reversible cloak. Some of us will be hemming the edges, while others intend to use seam binding.
As far as clasps go, I think most of us are planning on sewing on frogs. The dude with the reversible cloak will be sewing a cord into the neck that can be tied. This lets the cloak be totally reversible. Also convenient if anyone ever gets annoyed with him :)
I shall post a hood pattern when I get one. This whole project is going to be very fly-by-the-seat-of-the-pants. Sure, I can teach 10 people to sew at the same time while keeping track of 4 different machines! It shall be a true adventure!
Thursday, January 31, 2008
Monday, January 28, 2008
Cloaks!
I decided to be a bum and buy a cloak so that I'll have something until I get the time to make my own. The primary issue I ran into with this is that I want something functional, not just pretty. A lot of cloaks, especially costume cloaks, are made out of very thin fabric, and this will not work for me. What I settled on was this:
Pros - It has a nice woven look, it should be warm, it has an AWESOME clasp (its a two-headed sea serpent)
Cons - Its blue (which was a difficult color to obtain unless you were very wealthy), it has velcro around the clasp, it is actually a synthetic
I'm debating lining it when I recieve it. Is that horrible to do to a vintage cloak? It probably kinda is, but if its not warm enough I'll do it anyhow. All in all though, I'm very excited about getting this :)
Sunday, January 27, 2008
Ideas for a Lined Coif
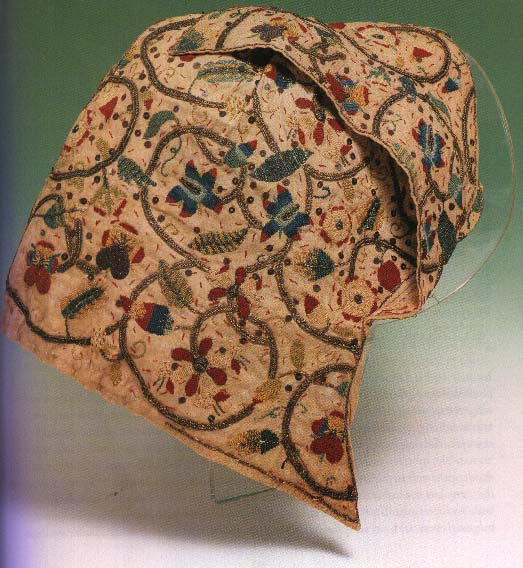
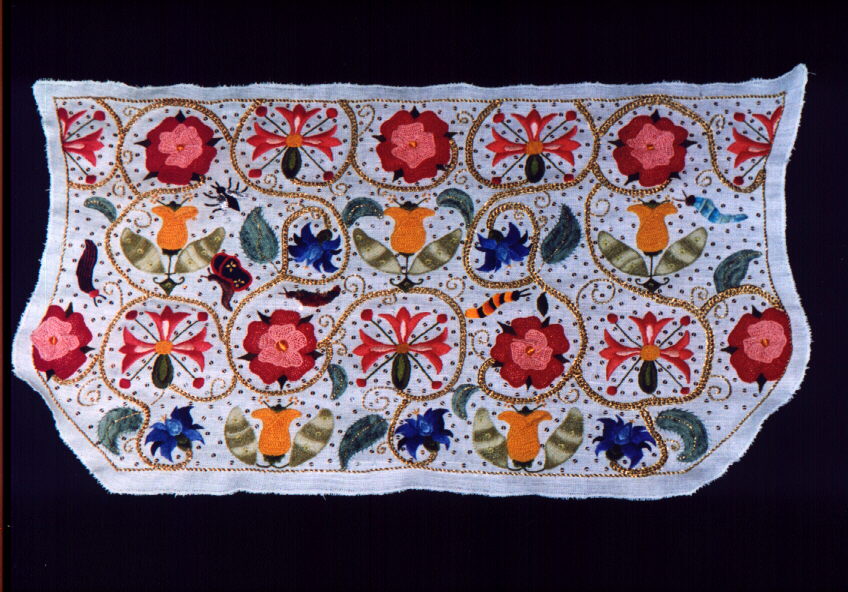
Although my first coif is bangin', I'm going to try a slight variation on it today. As I stated before, it was not uncommon for a lady of wealth and status to have an embroidered silk coif. This would often be lined because the silk was not washable. It kept hair oil off of the silk. I am going to attmept a lined coif. My outer layer is going to be an offwhite woven material with an ivy pattern. I chose this material because the pattern reminded me of the embroidery on some of the silk coifs seen here. While my material is not silk (its more like wool, which would be period) it is not washable, so it needs to be lined. For the lining, I'm going to use the same white mystery fabric I used on my other coif. I will also be adding a white lace edging. Historically, edging could be white, offwhite, black, or metalic. If you plan to use lace, I reccomend you look at pictures to try and get a feel for what the laces of the time looked like.
I will be using my adaption (its resized) of this pattern. Steps will be as follows:
1) Cut out pattern from both fabrics
2) Hem curved edges and bottom
3) Pin the two pieces with wrong sides together
4) Sew together 1/4" from bottom edge
5) Sew another seam 3/4" above the bottom edge. This will create a drawstring channel.
6) With the two pieces together, gather stitch across the top from 5" from one edge to 5" from the other edge 1/2" down from the top of the fabric. Stitches should be 1/4" in length. These should be done by hand. Leave about 6" extra thread on each end of your line of stitches.
7) Repeat above 1/4" from top of fabric
8) Fold the piece in half with the lining to the outside. Pin together.
9) Sew the top together 1/2" from the top from the curved edge to 1/2" in front of the gather stitching.
10) Pin the lace into the curved edges between the two layers of fabric. Sew. (this might need to be done by hand - it will be fussy on machine) Be certain not to sew closed the drawstring channel.
11) Pull the gather stitches as tight as you can and tie the ends together. Make sure the gather ends up on the lining side of the hat.
12) Thread the drawstring through the channel.
This should finish it. We'll see how it goes.
Some links I didn't post before:
1) How to wear the coif: http://www.extremecostuming.com/articlesii/howtowearthecoif.html
2) Amazing Reproduction V&A coif: http://www.extremecostuming.com/reproductions/vacoift281975.html
Saturday, January 26, 2008
Coifs (also called Biggins)
EDIT: Coherent summary of my coif research available here
I spent this afternoon researching and making a coif (pronounced kwaf, I'm told). Coifs were little skullcaps worn by both men and women in the medieval times. It served the purpose of both keeping one's hair out of the way (and probably keeping lice under control) and of helping to keep one warm. Coifs were traditionally white or off white and could be made out of linen, silk or similar fabric. However, upper class ladies could occasionally have a colored coif. Colors became more common as time progressed, but were always the exception, not the norm.
The coif pattern is almost always depicted in drawings as though it were more than piece. However, the remaining historical coifs are ALL once piece, so the idea of a two or three piece pattern is probably not historically accurate. The extant coifs all date from the late 1500s or later, most being from the 1600s with a few from the early 1700s. My personal time period of interest is the early 1500s, specifically 1523. However, there are to my knowledge no coifs existing from that time period. The earliest depiction of a woman's coif (that I am aware of) is in a picture of a woman that is alledgedly Anne Boelyn (but it might be another woman - more on that another day).

This was analyized as a coif with a band tied around the head. The clips on the ear flaps are suspected to be metal, possibly used to hold on a gable hood. But I digress.
I found several coif patterns online:
1) both a one and 3 piece pattern with chin strap: http://www.virtue.to/articles/coif.html
2) a one piece pattern without chin strap: http://www.elizabethancostume.net/headwear/coifmake.html
3) another three piece pattern: http://www.margospatterns.com/coif_manual.pdf
Trying to be historically accurate, I opted for pattern #2, the one piece coif with no chin strap. I made it out of a mystery remnant. My best guess is that it is all or mostly cotton. I had to adjust the size of this pattern greatly, adding two inches to the folded edge and an inch and a half to the top, but I'm not totally sure my printer didn't resize the pattern. I will post my pattern as a pdf so others can use it in the next couple days.
Once the pattern was appropriately resized, this was a fairly easy project. The directions on elizabethancostume.net were a bit confusing and hard to follow in places, but I came out with a very nice coif that fits my head quite well. It has no chin strap, but the gather at the back of the neck pulls the coif tightly over my ears, fitting it closely to my head and keeping it on well. This was a pleasant surprise, as one site I'd read (see source 2 below) spoke of how reenactors often have difficulty keeping coifs on without bobbypins or elastic. With the drawstring pulled up, mine fits well enough that I think it would stay on no matter what I was doing. Which makes me happy because I don't have to use a historically inaccurate method.
My notes on this pattern are:
1) check the sizing
2) when I sewed the top together, it came to a sharp point - the curved edges should be flattened a bit at the top to make this more of a smooth curve
3) I used a ribbon for the drawstring. Very period, not all that practical - it must be double-knotted to hold.
other resources:
1) coif embroidery: http://www.geocities.com/aenor_anjou/coif.htm
I spent this afternoon researching and making a coif (pronounced kwaf, I'm told). Coifs were little skullcaps worn by both men and women in the medieval times. It served the purpose of both keeping one's hair out of the way (and probably keeping lice under control) and of helping to keep one warm. Coifs were traditionally white or off white and could be made out of linen, silk or similar fabric. However, upper class ladies could occasionally have a colored coif. Colors became more common as time progressed, but were always the exception, not the norm.
The coif pattern is almost always depicted in drawings as though it were more than piece. However, the remaining historical coifs are ALL once piece, so the idea of a two or three piece pattern is probably not historically accurate. The extant coifs all date from the late 1500s or later, most being from the 1600s with a few from the early 1700s. My personal time period of interest is the early 1500s, specifically 1523. However, there are to my knowledge no coifs existing from that time period. The earliest depiction of a woman's coif (that I am aware of) is in a picture of a woman that is alledgedly Anne Boelyn (but it might be another woman - more on that another day).
This was analyized as a coif with a band tied around the head. The clips on the ear flaps are suspected to be metal, possibly used to hold on a gable hood. But I digress.
I found several coif patterns online:
1) both a one and 3 piece pattern with chin strap: http://www.virtue.to/articles/coif.html
2) a one piece pattern without chin strap: http://www.elizabethancostume.net/headwear/coifmake.html
3) another three piece pattern: http://www.margospatterns.com/coif_manual.pdf
Trying to be historically accurate, I opted for pattern #2, the one piece coif with no chin strap. I made it out of a mystery remnant. My best guess is that it is all or mostly cotton. I had to adjust the size of this pattern greatly, adding two inches to the folded edge and an inch and a half to the top, but I'm not totally sure my printer didn't resize the pattern. I will post my pattern as a pdf so others can use it in the next couple days.
Once the pattern was appropriately resized, this was a fairly easy project. The directions on elizabethancostume.net were a bit confusing and hard to follow in places, but I came out with a very nice coif that fits my head quite well. It has no chin strap, but the gather at the back of the neck pulls the coif tightly over my ears, fitting it closely to my head and keeping it on well. This was a pleasant surprise, as one site I'd read (see source 2 below) spoke of how reenactors often have difficulty keeping coifs on without bobbypins or elastic. With the drawstring pulled up, mine fits well enough that I think it would stay on no matter what I was doing. Which makes me happy because I don't have to use a historically inaccurate method.
My notes on this pattern are:
1) check the sizing
2) when I sewed the top together, it came to a sharp point - the curved edges should be flattened a bit at the top to make this more of a smooth curve
3) I used a ribbon for the drawstring. Very period, not all that practical - it must be double-knotted to hold.
other resources:
1) coif embroidery: http://www.geocities.com/aenor_anjou/coif.htm
2) an amazing article on a reproduction one piece coif (no pattern): http://www.elizabethancostume.net/headwear/coifmake.html
3) wikipedia - the source of all knowledge: http://en.wikipedia.org/wiki/Coif
4) Tudor and Elizabethan coifs: http://www.elizabethancostume.net/headwear/coif.html
5) Extant 16th and 17th century coifs: http://www.elizabethancostume.net/headwear/coifpics.html
6) Reproduction embroidered coif picture: http://www.elizabethancostume.net/images/pkcoif1.jpg
7) Talks a bit about a coif under "construction": http://www.modehistorique.com/elizabethan/coif.html
8) Coifs from the V&A museum: http://www.elizabethancostume.net/va/coifs.html
There was also a magnificent article on how the hair was worn under the coif that I can no longer find... Will post it if it reappears.
interesting:
1) astronaut wearing a coif under his spacesuit in 1975: http://grin.hq.nasa.gov/IMAGES/SMALL/GPN-2000-000993.jpg
Pics of my coif and a pattern will be coming soon!
Subscribe to:
Posts (Atom)